What Is Capture Variable Validation?
This feature checks the customer’s reply before saving it into your system to make sure it’s valid.
✅ Use Cases:
Collecting numbers, emails, links, or other structured info.
Prevents typos or unrelated replies.
Step 1: Enable Capture Validation
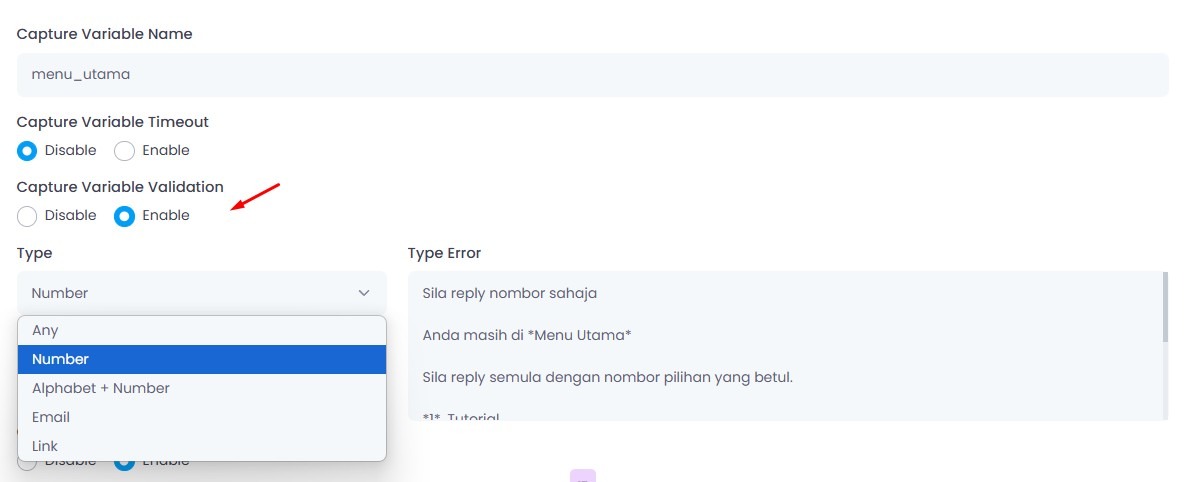
Enable the option “Capture Variable Validation”.
Step 2: Choose Validation Type

| Type | Description | Example |
|---|---|---|
| Any | Accept all types of replies | Yes, okay, 123 |
| Number | Accept only numeric input | 1, 99, 2024 |
| Alphabet + Number | Accept letters and numbers | abc123, x9z |
| Accept valid email format only | [email protected] | |
| Link | Accept only valid URLs | https://example.com |
Step 3: Set Type Error Message
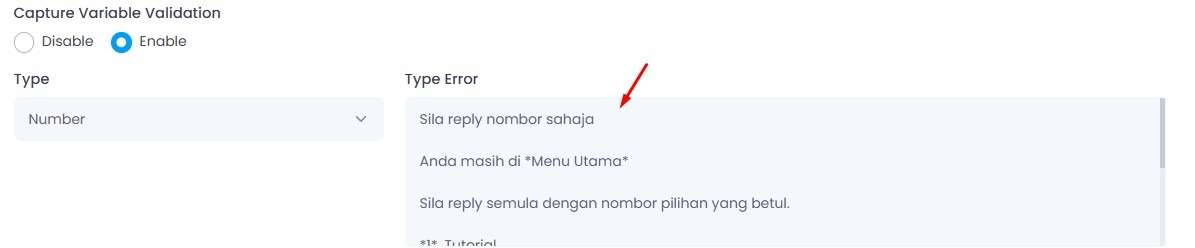
Customize the error message to guide users if they reply with the wrong input.
Example:
					❌ Sila reply nombor sahaja
📌 Anda masih di *Menu Utama*
✅ Sila reply semula dengan nombor pilihan yang betul.
🎯 Why Use This?
- Prevent wrong data like typos or unrelated replies.
- Improve data quality for downstream processing (like filling forms, syncing CRM, etc.).
- Make chatbot flows more intelligent and error-proof.
Conditional Next Bot (Logic After Reply)

⚙️ How to Configure It
1. Enable Conditional Logic
Turn ON: Capture Variable Conditional Next Bot Action
2. Choose Next Bot Type
Keyword → triggers another bot based on keyword name
ID → triggers a bot using its internal ID (safer for complex flows)
3. Keep or Replace Value
Keep → Save user’s actual reply
Replace → Save a new value (e.g. map “1” to “harga”)
4. Setup Conditions (IF / ELSE IF / ELSE)
Here’s how the logic works:
What is IF?
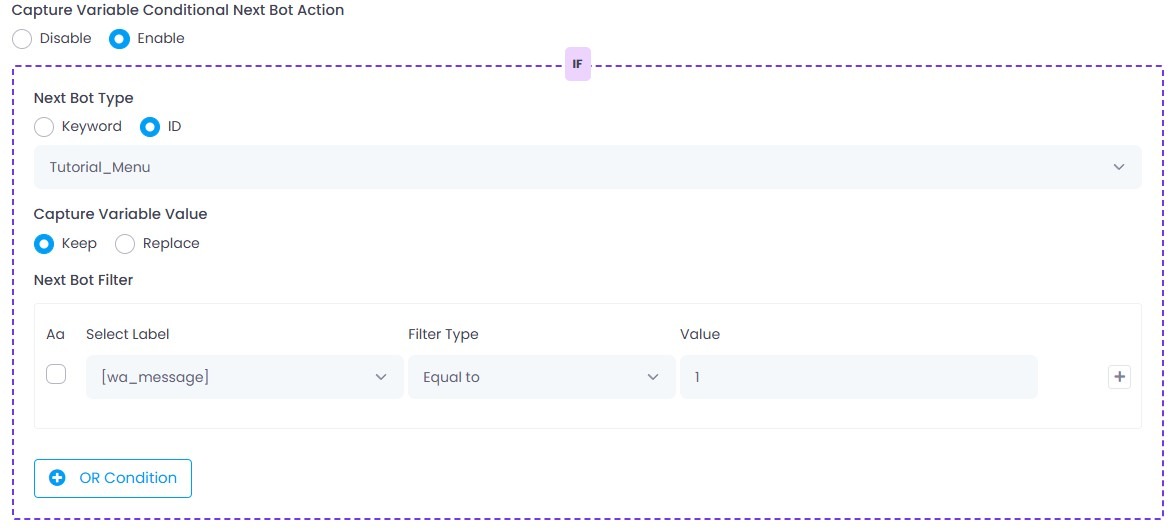
- Your main rule.
- Checks if user reply matches your first condition.
- If matched → Go to the defined bot immediately.
IF means:
- “If the user’s reply matches this specific condition, then go to this bot.”
✅ Example Use Case:
You ask the user:
					Sila balas dengan nombor pilihan:
1. Tutorial
2. Harga
3. Bercakap dengan Admin
⚙️Then in your chatbot settings, you configure:
| Setting | Value |
|---|---|
| Label | [wa_message] |
| Filter Type | Equal to |
| Value | 1 |
So when the user replies with:
1
📌 The chatbot will immediately go to Tutorial_Menu.
No further conditions are checked.
➕ ELSE IF Next Bot
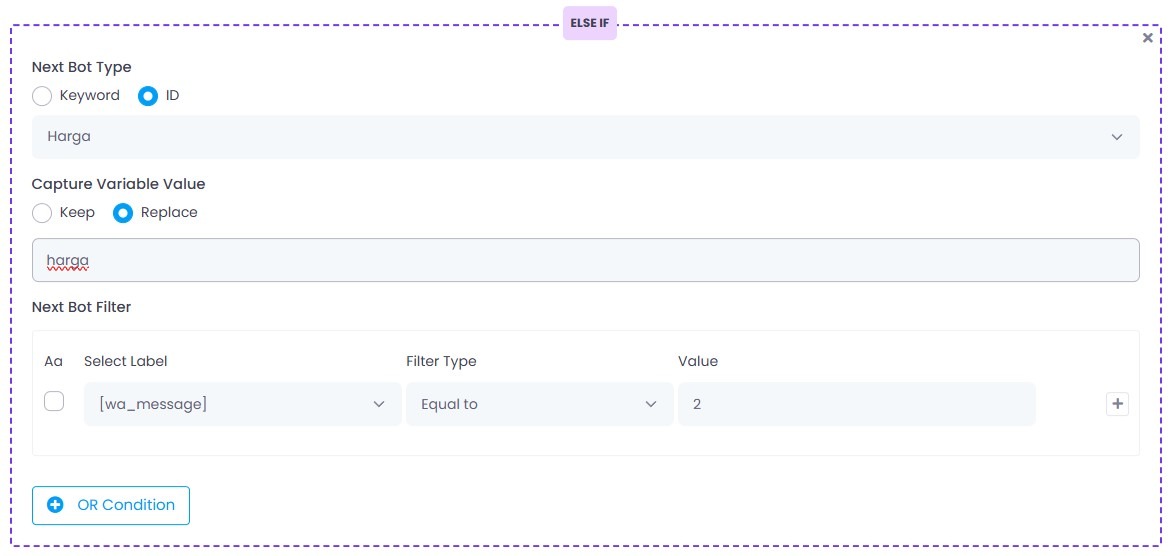
ELSE IF is the backup condition if the first IF rule didn’t match.
You use it when:
- You want to check for other possible replies
- You need different responses for different inputs
You can create multiple ELSE IFs to match each specific value.
✅ Example:
| Reply | Action |
|---|---|
| 1 | Go to Tutorial_Menu |
| 2 | Go to Harga |
| 3 | Go to bercakap_team_cs |
So in your chatbot:
ELSE IF reply = 2 → Go to Bot ID: Harga
ELSE IF reply = 3 → Go to Keyword: bercakap_team_cs
If the user replies:
2
✅ The bot triggers the Harga bot.
If the user replies:
3
✅ The bot triggers the bercakap_team_cs keyword.
If the reply is still not matching, it goes to ELSE.
❌ ELSE → Show Error
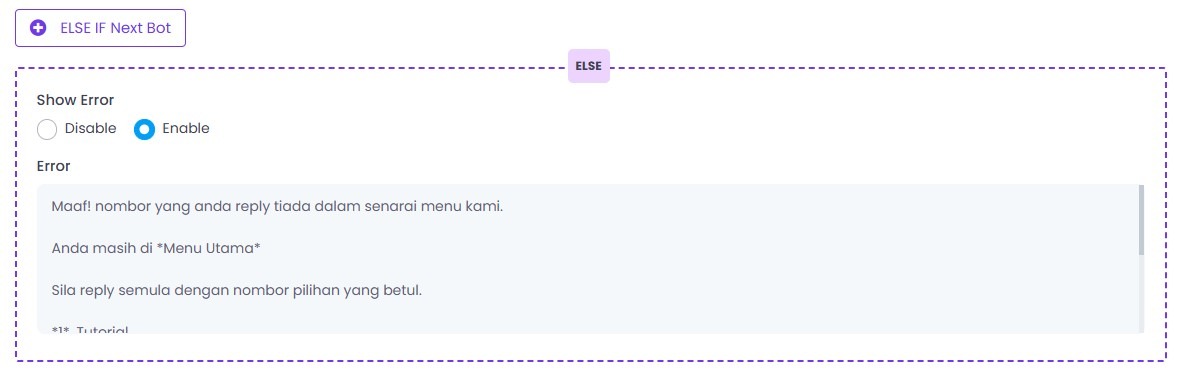
🔷 What is ELSE?
ELSE is your final safety net — the fallback action if no previous conditions matched.
This ensures:
- Users are not left hanging.
- They get clear instructions to try again.
✅ When to use ELSE?
- When the user replies with unexpected input
- When you want to show an error or repeat instructions
📌 Example ELSE Message:
					❌ Maaf! nombor yang anda reply tiada dalam senarai menu kami.
📌 Anda masih di *Menu Utama*
➡️ Sila reply semula dengan nombor pilihan yang betul.
So if someone replies:
abc
Or:
7
The bot doesn’t find a match in any IF/ELSE IF, so it shows this ELSE error and stays in the same menu.
Summary of Flow:
| Condition | Action |
|---|---|
| IF = 1 | Go to Tutorial_Menu |
| ELSE IF = 2 | Go to Harga |
| ELSE IF = 3 | Go to bercakap_team_cs |
| ELSE | Show error message |
🎯 Why Is This Powerful?
- Gives full control over user input
- Makes chatbot feel intelligent
- Helps avoid silent failures
- Keeps users within the correct flow
Aa – Case Sensitive Filter
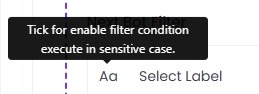
When you tick this checkbox, the filter becomes case sensitive.
✅ Example:
With case sensitivity ON:
Hello ≠ hello
So only exact casing will match.
Use this only when needed, like when capturing codes or exact commands.
"Label" in Next Bot Filter
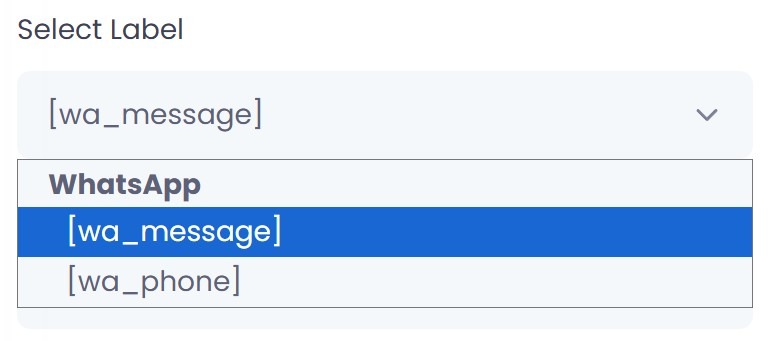
In the dropdown, you can see two labels:
[wa_message]
[wa_phone]
These labels represent the data fields captured during the user interaction on WhatsApp. You use them to decide what value to filter or evaluate before moving to the next bot.
🔹 [wa_message] – Most Common Label
This refers to the user’s reply message (text) on WhatsApp.
✅ Use this when you want to check what the user typed in reply to your bot.
Example use cases:
| User Reply | Filter Condition | Action |
|---|---|---|
1 | [wa_message] = 1 | Go to Bot A |
harga | [wa_message] contains harga | Go to Harga Bot |
🔹 [wa_phone] – User’s WhatsApp Number
This refers to the sender’s phone number.
✅ Use this if you want to:
Trigger special flows only for specific users.
Whitelist or blacklist certain numbers.
Example use cases:
| Phone Number | Filter Condition | Action |
|---|---|---|
60123456789 | [wa_phone] = 60123456789 | Go to VIP Bot |
| Any number | [wa_phone] is not empty | Proceed normally |
💡 When to Use Which?
| Use Case | Label to Choose |
|---|---|
| Match based on user’s reply | [wa_message] |
| Match based on sender’s number | [wa_phone] |
Filter Type Explanations
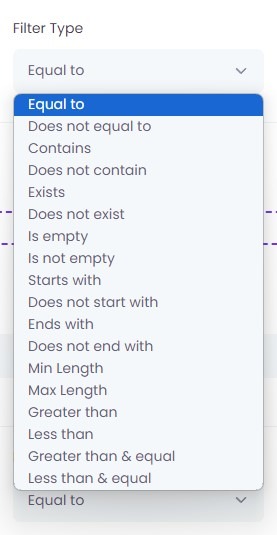
| Filter Type | Description |
|---|---|
| ✅ Equal to | Match if value is exactly the same (case-insensitive unless set). 📌 Example: 1 = 1 |
| ❌ Does not equal to | Match if value is different. 📌 Example: 2 ≠ 1 |
| 🔎 Contains | Match if text contains the keyword. 📌 Example: “harga cmc” contains “harga” |
| 🚫 Does not contain | Match if text does not include keyword. 📌 Example: “produk” does not contain “harga” |
| ✅ Exists | Field exists and is not empty. |
| ❌ Does not exist | Field is completely missing. |
| 🈳 Is empty | Field is blank or not filled. |
| ✏️ Is not empty | Field has any value. |
| 🅰 Starts with | Match if text starts with characters. 📌 Example: “1. Order” starts with “1” |
| 🛑 Does not start with | Text does not start with specified characters. |
| 🔚 Ends with | Match if text ends with characters. 📌 Example: “Order now!” ends with “!” |
| ❌ Does not end with | Text does not end with specified characters. |
| 🔢 Min Length | Value must be at least X characters. 📌 Example: “abcde” = Min length 5 |
| 📏 Max Length | Value must not exceed X characters. |
| 🔼 Greater than | Numeric value must be more than X. |
| 🔽 Less than | Numeric value must be less than X. |
| 🔼 Greater than & equal | Numeric value must be ≥ X. |
| 🔽 Less than & equal | Numeric value must be ≤ X. |
FAQ
1. Why must there be “Next Bot”?
Because after a user replies, the system must know where to go next. If no Next Bot is set, the conversation stops.
2. What is “ID”? Is it the ID of another bot?
Yes, “ID” means you’re linking to a bot by its unique internal ID. This is useful when you don’t want to depend on keyword names.
3. What to fill in “Next Bot Filter” section?
| Field | What to Fill |
|---|---|
| Select Label | [wa_message] (user reply) |
| Filter Type | Equal to, Contains, etc. |
| Value | 1, 2, or your condition |
4. What happens if none of the IF or ELSE IF conditions match?
The bot uses the ELSE fallback, which shows a message like:
					❌ Maaf! nombor yang anda reply tiada dalam senarai menu kami.
📌 Anda masih di *Menu Utama*
➡️ Sila reply semula dengan nombor pilihan yang betul.